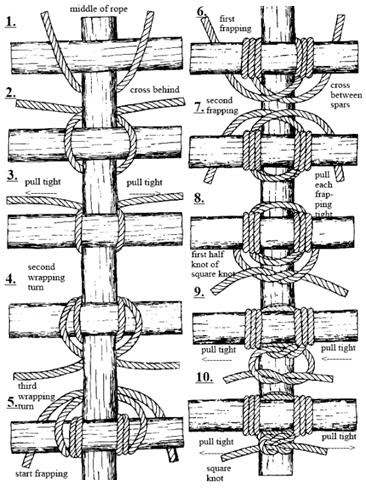
This month's theme is Mechanics which, in a way, can be thought of as "advanced pioneering." Mechanics relies heavily upon a working knowledge of engineering and physics. Understanding the six basic machines (the lever, wheel and axle, pulley, inclined plane, wedge and screw) as well as how they can work to your advantage will help you in designing and constructing everything from simple camp projects to more complex builds such as bridges and towers. With a good foundation in simple machines and strong skills with lashings the rest is limited only by your designs and imagination! Check out the image above to learn about a simplified form of a square lashing called the "Japanese Square Lashing." To learn more about simple machines you can check out this link to see a good book on mechanical fundamentals which should be available in your local library.
Wednesday, May 1, 2013
Mechanical advantage.
This month's theme is Mechanics which, in a way, can be thought of as "advanced pioneering." Mechanics relies heavily upon a working knowledge of engineering and physics. Understanding the six basic machines (the lever, wheel and axle, pulley, inclined plane, wedge and screw) as well as how they can work to your advantage will help you in designing and constructing everything from simple camp projects to more complex builds such as bridges and towers. With a good foundation in simple machines and strong skills with lashings the rest is limited only by your designs and imagination! Check out the image above to learn about a simplified form of a square lashing called the "Japanese Square Lashing." To learn more about simple machines you can check out this link to see a good book on mechanical fundamentals which should be available in your local library.
Wednesday, April 24, 2013
Cooking is not the same as baking.
Baking is a sensitive subject - no really, it is sensitive. Cooking usually allows much more freedom for changing flavors with spices, flexibility in cook times and some freedom over temperature. Baking, on the other hand, does not. However, this should not make you apprehensive about baking but rather it should help you focus on the recipe and details such as temperature, time and precise measurement. Baked goods, from breads to cakes, are especially delicate in that they are leavened (risen) products that use either yeast and sugar or baking soda and salt. Leaved products also usually take more time as there are stages at which the dough or batter must rise before being baked (this is almost always the case when using yeast and sugar). You can take comfort in the fact that basic baked goods are no more technically difficult, in principle, than basic cooking. If you pay close attention to details, like those listed above, you will be well on your way to making quality meals and baked treats.
Hobo Bread
(Adapted from cooks.com)
STEP 1:
2 cups raisins
2 cups boiling water
2 tablespoon butter
2 teaspoon baking soda
Pour boiling water over raisins, baking soda and butter. Let sit in refrigerator for 8 hours.
STEP 2:
2 eggs, beaten
2 cups sugar
1/2 cup nuts
1/2 teaspoon salt
1 teaspoon cinnamon
4 cups sifted flour
Stir all ingredients into raisin mixture from STEP 1 until thoroughly blended. Pour into greased and floured loaf pans or 3 pound coffee cans (1/2 full). Bake at 350F for 1 hour. Remove bread from loaf pans or coffee cans to let cool. Makes 1 loaf.
Hobo Bread
(Adapted from cooks.com)
STEP 1:
2 cups raisins
2 cups boiling water
2 tablespoon butter
2 teaspoon baking soda
Pour boiling water over raisins, baking soda and butter. Let sit in refrigerator for 8 hours.
STEP 2:
2 eggs, beaten
2 cups sugar
1/2 cup nuts
1/2 teaspoon salt
1 teaspoon cinnamon
4 cups sifted flour
Stir all ingredients into raisin mixture from STEP 1 until thoroughly blended. Pour into greased and floured loaf pans or 3 pound coffee cans (1/2 full). Bake at 350F for 1 hour. Remove bread from loaf pans or coffee cans to let cool. Makes 1 loaf.
Tuesday, April 23, 2013
Simplifying the camp kitchen.
There are many ways to simplify your cooking gear as well as decrease its weight. Titanium or aluminum kitchenware, simple stoves without pressurized fuel bottles and canister stoves made of lightweight materials are just some examples of the ways that your camp kitchen can become simpler and lighter - which should be especially useful when working with a limited backpack volume or hiking for extended distances. Although many of the ideas above will simplify your camp kitchen they may come at some cost with regard to a loss of control over cooking temperatures. For example, a MSR Dragonfly stove has two adjustments for flame control and can thereby simmer foods while a system like the Esbit solid fuel stove cannot - one stove offers cooking control while the other is lightweight and simple. Take your cook system into consideration when planning your next hike and use it along with your ingenuity to plan meals that will fill your stomach while not being too much of a burden on your back and joints.
Tin Foil Dinner
(Adapted from cooks.com)
Aluminum foil
1 medium onion, sliced
Cover the central area with 1/2 of the sliced onion.
5-6 large carrots, cut in long thin slices
Put 1/2 of the sliced carrots on top of the sliced onion.
1 large potato, cut in long thin slices or small cubes
Next put 1/2 of the sliced potatoes on top, then the hamburger patty. Add the other 1/2 of the potatoes, carrots and onion.
Salt and pepper
Add salt and pepper to the top of the layered ingredients.
Fold the aluminum foil and crease the seams firmly so that the juice/steam doesn't escape while cooking. Bake at 350 degrees or grill until hamburger is done and vegetables are tender, approximately 45-60 minutes. Be careful when opening as steam can rapidly escape and cause burns. Serves 1.
Tin Foil Dinner
(Adapted from cooks.com)
Aluminum foil
Make a double layer of aluminum foil approximately 12 inches in length.
1 medium onion, sliced
Cover the central area with 1/2 of the sliced onion.
5-6 large carrots, cut in long thin slices
Put 1/2 of the sliced carrots on top of the sliced onion.
1 large potato, cut in long thin slices or small cubes
1 hamburger patty, 1/4 to 1/3 lb. patty
Next put 1/2 of the sliced potatoes on top, then the hamburger patty. Add the other 1/2 of the potatoes, carrots and onion.
Salt and pepper
Add salt and pepper to the top of the layered ingredients.
Fold the aluminum foil and crease the seams firmly so that the juice/steam doesn't escape while cooking. Bake at 350 degrees or grill until hamburger is done and vegetables are tender, approximately 45-60 minutes. Be careful when opening as steam can rapidly escape and cause burns. Serves 1.

Wednesday, April 17, 2013
"One fish, two fish [ . . . ]." Dr. Seuss
If you are lucky enough to go fishing during an outing and are even luckier by catching a fish you must then deal with making it edible by cleaning (this is the easy part). Check out the video in this post to see how simple it is to clean a small fish such as a Brook or Rainbow Trout. When cooking fish always use as few additives as possible and avoid overcooking - the tail end will always cook fastest. Overcooking can be prevented by elevating the tail over a piece of wood like a smoker block or by moving the tail to the coolest part of the frying pan and by paying attention to the texture of the fish while cooking. If you are having other foods with your fish cook the most dense foods first (potatoes, carrots, etc.) and cut them into small evenly-sized pieces. Cook the fish towards the end of the cooking session so that everything finishes at about the same time. Eat well and don't be afraid of your food!
Pan-Fried Trout
(Adapated from whatscookingamerica.net)
2 whole Trout (1-pound each), cleaned (head, gills and skin can be on or off)
Rinse the cleaned fish under cold water and pat dry with paper towels. Cut a few diagonal slashes along each side of the fish.
1 plate of all-purpose flour
Salt and pepper
Season the flour with salt and pepper. Roll the cleaned trout in the seasoned flour until covered.
2 ounces butter
2 ounces canola oil (or other high smoke point oil)
Mix butter and oil in pan and melt/heat. Heat the butter in a frying pan until bubbling and then fry the trout for about 5 minutes on each side until golden brown. Cook trout until browned or until internal temperature reads 140F. Perfectly cooked fish is nearly opaque, should be very moist and will flake easily with a fork. Makes 2 servings.
Tuesday, April 16, 2013
Nutrition is not a suggestion.
Understanding which foods can supply your daily needs for vitamins, minerals and general sustenance will help you by giving you a range of healthful things to eat. When you are shopping for camping foods (and food in general) be sure to read and understand food and ingredient labels as well as how the nutritional and energy value of the food fits into your overall daily needs. This is easier for packaged foods than it is for fresh produce but there are nutritional databases available online that may help with the latter. Another strategy for keeping your vitamins and minerals balanced in your diet is to make your snacks like "mini meals" with all of the food groups represented, in greatly reduced portions. Have fun as you are learning about meal planning, grocery shopping and understanding how to keep your body's metabolic fire burning in the safest and most complete way possible.
Trail Mix Bars
(Adapted from Allrecipes.com)
Cooking spray
Spray a 9x13-inch baking dish with cooking spray.
3 cups crispy rice cereal
3 cups toasted oat cereal rings (such as Cheerios)
1 1/2 cups raw unsalted sunflower seeds
1 cup raisins
3/4 cup chocolate chips
Mix crispy rice cereal, oat cereal rings, sunflower seeds, raisins, and chocolate chips together in a large bowl.
1 cup honey
3/4 cup brown sugar
2 cups peanut butter
1 teaspoon vanilla extract
Stir honey and brown sugar in a saucepan, place over high heat, and bring to a boil. Stir and boil for 1 minute. Remove from heat and stir in peanut butter and vanilla extract until smooth and well blended.
Pour the hot peanut butter mixture into the dry ingredients and stir until all dry ingredients are moistened. Press the mixture into the prepared baking dish to make an even layer. Let cool and cut into bars. Makes 24 bars.
Trail Mix Bars
(Adapted from Allrecipes.com)
Cooking spray
Spray a 9x13-inch baking dish with cooking spray.
3 cups crispy rice cereal
3 cups toasted oat cereal rings (such as Cheerios)
1 1/2 cups raw unsalted sunflower seeds
1 cup raisins
3/4 cup chocolate chips
Mix crispy rice cereal, oat cereal rings, sunflower seeds, raisins, and chocolate chips together in a large bowl.
1 cup honey
3/4 cup brown sugar
2 cups peanut butter
1 teaspoon vanilla extract
Stir honey and brown sugar in a saucepan, place over high heat, and bring to a boil. Stir and boil for 1 minute. Remove from heat and stir in peanut butter and vanilla extract until smooth and well blended.
Pour the hot peanut butter mixture into the dry ingredients and stir until all dry ingredients are moistened. Press the mixture into the prepared baking dish to make an even layer. Let cool and cut into bars. Makes 24 bars.
Wednesday, April 10, 2013
"A Scout is: [ . . . also] Clean" in the kitchen.
Much of the anxiety in camp cookery (besides determining what to eat) regards cleanliness. With news headlines regularly frightening the general public about E. coli outbreaks at national food chains it should come as no surprise. Fortunately there are a few simple steps that will keep you, your food and equipment clean and ready for use and will reduce the chance of contamination and resulting illness.
Cleaning yourself:
Wash your hands thoroughly before beginning cooking, after handling any raw meats and whenever you have the slightest suspicion that your hands may not clean enough.
Cleaning food:
Rinse fruits, vegetables and meats as part of regular meal preparation. Store raw meat away from other ingredients during food preparation.
Cleaning equipment:
Wash your cooking gear thoroughly using the three pot method detailed in your Scout Handbook. If you are using a minimalist cooking kit wash anything that comes into contact with food three times (with hot water containing biodegradable soap, hot water rinse, then cold water with sanitizer) then allow to air dry. Also wash all equipment that touches raw meat before reusing it in the same cooking session. Some equipment such as cast iron and non-stick coated pans require special care - be sure to check out the instructions for cleaning them when they are purchased or ask anyone who uses this equipment regularly about proper cleaning.
Biscuits and Sausage Gravy
(Adapted from Pacific Northwest Trail Cook Book by John and Roberta Wolcott)
Preheat stove top oven or dutch oven.
1/3 cup shortening
1 1/3 cups flour
2 1/2 tsp. baking powder
3/4 tsp. salt
3/4 cups milk
Mix dry ingredients. Cut shortening into dry ingredients. Slowly add milk and knead (less is best - the more you knead the harder the biscuits become). Roll out and cut biscuits. Bake until golden brown. Reduce heat to minimum (or turn off and wrap biscuits in tinfoil) to keep biscuits warm until gravy is ready. Serves 6.
3 lbs. sausage
3/4 cups flour
Seasoning salt (or salt and pepper) to taste
6 cups milk
Brown sausage in skillet or dutch oven. Dust flour over the browned sausage and brown it with the already browned sausage. Add milk slowly and thicken to desired consistency. Serve poured over biscuits. Serves 12.
Cleaning yourself:
Wash your hands thoroughly before beginning cooking, after handling any raw meats and whenever you have the slightest suspicion that your hands may not clean enough.
Cleaning food:
Rinse fruits, vegetables and meats as part of regular meal preparation. Store raw meat away from other ingredients during food preparation.
Cleaning equipment:
Wash your cooking gear thoroughly using the three pot method detailed in your Scout Handbook. If you are using a minimalist cooking kit wash anything that comes into contact with food three times (with hot water containing biodegradable soap, hot water rinse, then cold water with sanitizer) then allow to air dry. Also wash all equipment that touches raw meat before reusing it in the same cooking session. Some equipment such as cast iron and non-stick coated pans require special care - be sure to check out the instructions for cleaning them when they are purchased or ask anyone who uses this equipment regularly about proper cleaning.
Biscuits and Sausage Gravy
(Adapted from Pacific Northwest Trail Cook Book by John and Roberta Wolcott)
Preheat stove top oven or dutch oven.
1/3 cup shortening
1 1/3 cups flour
2 1/2 tsp. baking powder
3/4 tsp. salt
3/4 cups milk
Mix dry ingredients. Cut shortening into dry ingredients. Slowly add milk and knead (less is best - the more you knead the harder the biscuits become). Roll out and cut biscuits. Bake until golden brown. Reduce heat to minimum (or turn off and wrap biscuits in tinfoil) to keep biscuits warm until gravy is ready. Serves 6.
3 lbs. sausage
3/4 cups flour
Seasoning salt (or salt and pepper) to taste
6 cups milk
Brown sausage in skillet or dutch oven. Dust flour over the browned sausage and brown it with the already browned sausage. Add milk slowly and thicken to desired consistency. Serve poured over biscuits. Serves 12.
Tuesday, April 9, 2013
The Swedish Chef.

Anyone who has seen The Swedish Chef on The Muppet Show has realized that the comedy comes from the nonsense and the inevitable mess that the character makes. But did you know that these are also common pitfalls in real cooking? The nonsense usually comes from cooking in a hurry, not understanding the recipe or not taking the time to properly prepare ingredients while the mess usually comes from not getting everything organized before the cooking begins. As you can tell, this month's theme is cooking. To help with this there will be two posts per week for the month of April. Each post will also have two sections: The first section will detail some general cooking information or procedures and the second section will feature a recipe that you can try. Check out the online parts of the Scout Handbook on cooking, your regular Scout Handbook and the pamphlet for the Cooking Merit Badge for more information and most of all have fun!
A dutch oven is a medium-large cooking vessel with a lid that is typically made of cast iron, steel or ceramic materials. While not the lightest or smallest of options for cooking and extended trips it is certainly one of the best multi-taskers. Many recipes can be used with this single pot to greatly simplify your cooking and reduce the dishes that you have to clean. However, there are some special precautions that need to be used when using a dutch oven. Some recipes require that charcoal briquettes or coals be placed on the lid once it is on the oven - do not skip this because it sounds odd - the purpose is to create even heating and to increase the heat inside the dutch oven. Also, do not scrub the inside of a cast iron oven overly hard when cleaning and do not clean with soap as it removes the non-stick coating or "seasoning" from the oven and will make your next meals taste like soap. Always remember to reseason cast iron dutch ovens after they are clean and dry. Also avoid high acidity foods with a cast iron oven as this will promote rusting. If acidic foods are unavoidable simply rinse the oven immediately after it has cooled and don't delay the washing. Tips like these will help you get the most use out of a dutch oven as you develop your recipes and cooking skills.
Blackberry Cobbler
(Adapted from Byron's Dutch Oven Recipes)
4 cups fresh blackberries (or 2 bags of frozen then thawed)
1/2 cup sugar
1 1/2 tsp. grated lemon zest
1/4 cup water
Wash fresh blackberries and drain (or let frozen berries thaw then rinse). In a large bowl combine blackberries, 1/2 cup of sugar, lemon zest and water then stir to coat blackberries and let rest.
2 cups flour
2 cups sugar
1 Tbs. baking powder
1 tsp. salt
1 1/2 cups milk
In a separate bowl combine flour, 2 cups of sugar, baking powder and salt then stir to mix. Add milk and beat until batter is smooth.
1 stick butter
Melt butter using 10-12 briquettes under a 12" Dutch oven. Pour batter over melted butter slowly (do not stir). Carefully spoon blackberry mix over top of the batter (do not stir).
1 tsp. cinnamon
Sprinkle cinnamon over top.
Cover and bake using 10-12 briquettes under the dutch oven and 18-20 on the lid for 45 to 60 minutes. Rotate the oven and lid 1/4 turn in opposite directions every 10 minutes until crust is golden brown. Serves 10.
Subscribe to:
Posts (Atom)