Prepared. For Life. It’s more than a motto for Scouting; it’s a way to plan and execute each outing, even if it’s just a Saturday morning hike. In the woods, the products here (stowed in a daypack) can keep you comfortable, warm, hydrated, safe, and, most of all, prepared to face what nature puts in your path—whether you asked for it or not.
Sunday, August 11, 2013
Boy Scout 10 essentials: Items every Scout needs in the outdoors
Prepared. For Life. It’s more than a motto for Scouting; it’s a way to plan and execute each outing, even if it’s just a Saturday morning hike. In the woods, the products here (stowed in a daypack) can keep you comfortable, warm, hydrated, safe, and, most of all, prepared to face what nature puts in your path—whether you asked for it or not.
Thursday, July 25, 2013
Facebook Connection
Hello Scouts and Scouters. Social media like Facebook, Twitter, and so many more seem to be the way to "plug in" these days. Although this site will remain several administrators including Troop officers (SPL, ASPL, and PL's) will have access to our new Facebook page. You can find us by clicking here: Facebook Page
Wednesday, July 3, 2013
Blister prevention and treatment
Hiking does not have to hurt. Blisters are one of the most common injuries encountered while hiking and they can quickly ruin your trip through pain, infection and a reduced ability to hike. However, they are relatively easy to prevent and treat. Prevent blisters by wearing appropriate footwear that fits properly. New or poorly fitted boots are a common cause of foot pain and blisters. Be sure to break in new boots and to get refitted for boots if your feet are in a period of growth. You can also prevent blisters by treating "hot spots" immediately. You can deal with emerging blisters or hot spots by changing socks (to keep your feet dry), wearing sock liners (to reduce friction) and/or removing your boots as soon as possible (to let your feet cool). If you do get a blister treat it as soon as possible by cooling, cleaning and properly dressing the wound. If you take special care to do this properly you will reduce the chance of complications due to pain or infection. Check out this link to learn more about how to treat blisters. Remember that your feet are the only parts of you that touch the ground if take care of them you will have a much more enjoyable outing and will be able to hike without foot pain.
Wednesday, June 26, 2013
The electoral collage.
There are many ways in which elections can happen successfully and, unfortunately, many ways in which they can fail. As a Scout you have a the unique opportunity of participating in elections by nominating and voting for other Scouts that run for positions of leadership in the Troop. For government elections it is important that candidates represent their constituency or electorate. As a Scout this is already taken care of due to the fact that the Scouts running for positions are already representative of your Troop and its Patrols. It is also crucial, just as it is with other types of elections, that Scouts who apply for elected positions fully understand the duties of the positions for which they are candidates. As we prepare for the upcoming Troop elections take time to review the responsibilities of the positions that will become available, think about how you can contribute through an elected or appointed position and most of all take the elections seriously since they will have a direct influence on the leadership and activities of the Troop.
Wednesday, June 19, 2013
"You are here."
Here is a quick quiz. Are you ready? Go! What is the state tree? What is the state motto? Do you know the state bird? How about the state nickname? What is the state flower? Do you know the approximate population (rounded to the nearest million)? What is the state capital? How about the largest city? In what year did the state join the union? Finally, what is the highest point in the state? If some of the questions had you stumped check out the answers at the end of this post. Many states have distinct features, names and official symbols. Get to know more about The State of Washington by clicking on the flag image and take pride in its diversity and history. From temperate rainforests to deserts and from mountains to the ocean there is much to explore when it comes to your home state. (Answers: Western Hemlock, "By and by", American Goldfinch, "The Evergreen State", Coast Rhododendron, 7 million, Olympia, Seattle, 1889, Mt. Rainier [14,411 ft]).
Wednesday, June 12, 2013
Active citizenship.
There are may ways in which you can demonstrate active citizenship. Try to
understand the layers of your government, from your community to the nation-at-large. Envision how you are a unique part of your community and how you can embody its values in your daily life. Read
the U.S. Constitution and the U.S. Bill of Rights (they are quite interesting). Visit with an elected official to learn more about their
responsibilities. You can also meet your neighbors and begin learning about how you can work to improve your community together. You can start the process by exploring the Citizenship chapter of your Scout Handbook. Overall, be active and be thankful that you live in a country where you can participate!
Wednesday, June 5, 2013
Old Glory
The most valuable object in the Troop's possession is the American Flag. While most people get to see the American Flag daily few will have the opportunity to touch the flag or present it on a regular basis. As a Scout you have the unique honor of doing this regularly as part of every Scout meeting. However, there some occasions when the flag is directly handled and folded for presentation, storage or special commemorations. Navigate to this link to learn the proper procedures for honoring the American Flag by handling it properly while it is being folded. Remember that you have sworn to do your duty to your country every time you recite the Scout Oath. One of the many ways in which you can embody this oath is to treat the American Flag with the respect that it justly deserves.
Wednesday, May 29, 2013
"Gentlemen, [ . . . know] your engines!"
Knowing your way around an engine is not only fun but it is also a important component of safety. Keeping engines in good working order is critical for vehicles as well as for smaller engines, such as those found in landscaping and other tools. If you want to be a "grease monkey" check out the Automotive Maintenance Merit Badge requirements to learn more about engines, maintenance and safety. The Merit Badge will help you gain confidence as you help out with yard work, when you start driving or if you just have a general interest in engines and machines. Be safe, increase your knowledge and most of all have fun!
Wednesday, May 22, 2013
Intentional combustion.
There are many ways in which machines, both simple and complex, help to make everyday tasks more manageable. Simple machines include the lever, wheel and axle, pulley, inclined plane, wedge and screw. Complex machines are merely assemblies of many simple machines as well as purpose-specific parts designed for how the machine is intended to be used, such as bar and chain assemblies for a chainsaw or a long crankshaft and gearbox for a weed trimmer. Chances are good that you have already seen simple and complex machines at work today such as a weed trimmer, chainsaw, lawnmower or automobile. Watch the video above to get a brief introduction to a two-stroke engine's combustion cycle then consider how it is implemented in a device that you have used.
Wednesday, May 15, 2013
Force via rope.
There are many knots that Scouts will find useful but there are a special few which allow for variability that makes them especially good to know in camping situations. The "Trucker's Hitch" is one such knot and it is especially useful for tasks such as securing guy lines for tarps and shelters. Since this knot requires the working end to be doubled-back through a fixed loop (similar to a pulley) such as a "Directional Figure-Eight" or a "Slippery Hitch" it allows for the application of extra force on the standing end of the line. Watch the video to see one way this hitch can be tied. Try finishing the "Trucker's Hitch" with a "Taut-line Hitch" to allow for control over the line tension, a "Slippery Hitch" (as show in the video) to allow for a quick release or "Two Half Hitches" for the most security.
Wednesday, May 8, 2013
Flipping out.
What do you get when you combine Pioneering, Mechanics and a bit of mad science? A catapult! Think for just a second about how you would design a catapult. How many poles and lashings are needed? Where are the friction points? How is it controlled? What about anchorage? How will it be powered? What are you launching, how far and at what angle? What simple machine is responsible for operation of a catapult? Something that seems intuitive, like a catapult, actually involves quite a bit of design and engineering if it is to operate accurately, repeatedly and most of all safely. Here is a fun task: Draw up a design a simple catapult using as few parts and lashings as possible. Just remember, "Don't shoot your eye out!"
Wednesday, May 1, 2013
Mechanical advantage.
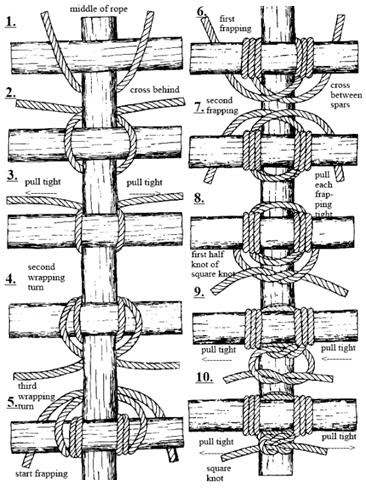
This month's theme is Mechanics which, in a way, can be thought of as "advanced pioneering." Mechanics relies heavily upon a working knowledge of engineering and physics. Understanding the six basic machines (the lever, wheel and axle, pulley, inclined plane, wedge and screw) as well as how they can work to your advantage will help you in designing and constructing everything from simple camp projects to more complex builds such as bridges and towers. With a good foundation in simple machines and strong skills with lashings the rest is limited only by your designs and imagination! Check out the image above to learn about a simplified form of a square lashing called the "Japanese Square Lashing." To learn more about simple machines you can check out this link to see a good book on mechanical fundamentals which should be available in your local library.
Wednesday, April 24, 2013
Cooking is not the same as baking.
Baking is a sensitive subject - no really, it is sensitive. Cooking usually allows much more freedom for changing flavors with spices, flexibility in cook times and some freedom over temperature. Baking, on the other hand, does not. However, this should not make you apprehensive about baking but rather it should help you focus on the recipe and details such as temperature, time and precise measurement. Baked goods, from breads to cakes, are especially delicate in that they are leavened (risen) products that use either yeast and sugar or baking soda and salt. Leaved products also usually take more time as there are stages at which the dough or batter must rise before being baked (this is almost always the case when using yeast and sugar). You can take comfort in the fact that basic baked goods are no more technically difficult, in principle, than basic cooking. If you pay close attention to details, like those listed above, you will be well on your way to making quality meals and baked treats.
Hobo Bread
(Adapted from cooks.com)
STEP 1:
2 cups raisins
2 cups boiling water
2 tablespoon butter
2 teaspoon baking soda
Pour boiling water over raisins, baking soda and butter. Let sit in refrigerator for 8 hours.
STEP 2:
2 eggs, beaten
2 cups sugar
1/2 cup nuts
1/2 teaspoon salt
1 teaspoon cinnamon
4 cups sifted flour
Stir all ingredients into raisin mixture from STEP 1 until thoroughly blended. Pour into greased and floured loaf pans or 3 pound coffee cans (1/2 full). Bake at 350F for 1 hour. Remove bread from loaf pans or coffee cans to let cool. Makes 1 loaf.
Tuesday, April 23, 2013
Simplifying the camp kitchen.
There are many ways to simplify your cooking gear as well as decrease its weight. Titanium or aluminum kitchenware, simple stoves without pressurized fuel bottles and canister stoves made of lightweight materials are just some examples of the ways that your camp kitchen can become simpler and lighter - which should be especially useful when working with a limited backpack volume or hiking for extended distances. Although many of the ideas above will simplify your camp kitchen they may come at some cost with regard to a loss of control over cooking temperatures. For example, a MSR Dragonfly stove has two adjustments for flame control and can thereby simmer foods while a system like the Esbit solid fuel stove cannot - one stove offers cooking control while the other is lightweight and simple. Take your cook system into consideration when planning your next hike and use it along with your ingenuity to plan meals that will fill your stomach while not being too much of a burden on your back and joints.
Tin Foil Dinner
(Adapted from cooks.com)
Aluminum foil
1 medium onion, sliced
Cover the central area with 1/2 of the sliced onion.
5-6 large carrots, cut in long thin slices
Put 1/2 of the sliced carrots on top of the sliced onion.
1 large potato, cut in long thin slices or small cubes
Next put 1/2 of the sliced potatoes on top, then the hamburger patty. Add the other 1/2 of the potatoes, carrots and onion.
Salt and pepper
Add salt and pepper to the top of the layered ingredients.
Fold the aluminum foil and crease the seams firmly so that the juice/steam doesn't escape while cooking. Bake at 350 degrees or grill until hamburger is done and vegetables are tender, approximately 45-60 minutes. Be careful when opening as steam can rapidly escape and cause burns. Serves 1.
Tin Foil Dinner
(Adapted from cooks.com)
Aluminum foil
Make a double layer of aluminum foil approximately 12 inches in length.
1 medium onion, sliced
Cover the central area with 1/2 of the sliced onion.
5-6 large carrots, cut in long thin slices
Put 1/2 of the sliced carrots on top of the sliced onion.
1 large potato, cut in long thin slices or small cubes
1 hamburger patty, 1/4 to 1/3 lb. patty
Next put 1/2 of the sliced potatoes on top, then the hamburger patty. Add the other 1/2 of the potatoes, carrots and onion.
Salt and pepper
Add salt and pepper to the top of the layered ingredients.
Fold the aluminum foil and crease the seams firmly so that the juice/steam doesn't escape while cooking. Bake at 350 degrees or grill until hamburger is done and vegetables are tender, approximately 45-60 minutes. Be careful when opening as steam can rapidly escape and cause burns. Serves 1.
Wednesday, April 17, 2013
"One fish, two fish [ . . . ]." Dr. Seuss
If you are lucky enough to go fishing during an outing and are even luckier by catching a fish you must then deal with making it edible by cleaning (this is the easy part). Check out the video in this post to see how simple it is to clean a small fish such as a Brook or Rainbow Trout. When cooking fish always use as few additives as possible and avoid overcooking - the tail end will always cook fastest. Overcooking can be prevented by elevating the tail over a piece of wood like a smoker block or by moving the tail to the coolest part of the frying pan and by paying attention to the texture of the fish while cooking. If you are having other foods with your fish cook the most dense foods first (potatoes, carrots, etc.) and cut them into small evenly-sized pieces. Cook the fish towards the end of the cooking session so that everything finishes at about the same time. Eat well and don't be afraid of your food!
Pan-Fried Trout
(Adapated from whatscookingamerica.net)
2 whole Trout (1-pound each), cleaned (head, gills and skin can be on or off)
Rinse the cleaned fish under cold water and pat dry with paper towels. Cut a few diagonal slashes along each side of the fish.
1 plate of all-purpose flour
Salt and pepper
Season the flour with salt and pepper. Roll the cleaned trout in the seasoned flour until covered.
2 ounces butter
2 ounces canola oil (or other high smoke point oil)
Mix butter and oil in pan and melt/heat. Heat the butter in a frying pan until bubbling and then fry the trout for about 5 minutes on each side until golden brown. Cook trout until browned or until internal temperature reads 140F. Perfectly cooked fish is nearly opaque, should be very moist and will flake easily with a fork. Makes 2 servings.
Tuesday, April 16, 2013
Nutrition is not a suggestion.
Understanding which foods can supply your daily needs for vitamins, minerals and general sustenance will help you by giving you a range of healthful things to eat. When you are shopping for camping foods (and food in general) be sure to read and understand food and ingredient labels as well as how the nutritional and energy value of the food fits into your overall daily needs. This is easier for packaged foods than it is for fresh produce but there are nutritional databases available online that may help with the latter. Another strategy for keeping your vitamins and minerals balanced in your diet is to make your snacks like "mini meals" with all of the food groups represented, in greatly reduced portions. Have fun as you are learning about meal planning, grocery shopping and understanding how to keep your body's metabolic fire burning in the safest and most complete way possible.
Trail Mix Bars
(Adapted from Allrecipes.com)
Cooking spray
Spray a 9x13-inch baking dish with cooking spray.
3 cups crispy rice cereal
3 cups toasted oat cereal rings (such as Cheerios)
1 1/2 cups raw unsalted sunflower seeds
1 cup raisins
3/4 cup chocolate chips
Mix crispy rice cereal, oat cereal rings, sunflower seeds, raisins, and chocolate chips together in a large bowl.
1 cup honey
3/4 cup brown sugar
2 cups peanut butter
1 teaspoon vanilla extract
Stir honey and brown sugar in a saucepan, place over high heat, and bring to a boil. Stir and boil for 1 minute. Remove from heat and stir in peanut butter and vanilla extract until smooth and well blended.
Pour the hot peanut butter mixture into the dry ingredients and stir until all dry ingredients are moistened. Press the mixture into the prepared baking dish to make an even layer. Let cool and cut into bars. Makes 24 bars.
Wednesday, April 10, 2013
"A Scout is: [ . . . also] Clean" in the kitchen.
Much of the anxiety in camp cookery (besides determining what to eat) regards cleanliness. With news headlines regularly frightening the general public about E. coli outbreaks at national food chains it should come as no surprise. Fortunately there are a few simple steps that will keep you, your food and equipment clean and ready for use and will reduce the chance of contamination and resulting illness.
Cleaning yourself:
Wash your hands thoroughly before beginning cooking, after handling any raw meats and whenever you have the slightest suspicion that your hands may not clean enough.
Cleaning food:
Rinse fruits, vegetables and meats as part of regular meal preparation. Store raw meat away from other ingredients during food preparation.
Cleaning equipment:
Wash your cooking gear thoroughly using the three pot method detailed in your Scout Handbook. If you are using a minimalist cooking kit wash anything that comes into contact with food three times (with hot water containing biodegradable soap, hot water rinse, then cold water with sanitizer) then allow to air dry. Also wash all equipment that touches raw meat before reusing it in the same cooking session. Some equipment such as cast iron and non-stick coated pans require special care - be sure to check out the instructions for cleaning them when they are purchased or ask anyone who uses this equipment regularly about proper cleaning.
Biscuits and Sausage Gravy
(Adapted from Pacific Northwest Trail Cook Book by John and Roberta Wolcott)
Preheat stove top oven or dutch oven.
1/3 cup shortening
1 1/3 cups flour
2 1/2 tsp. baking powder
3/4 tsp. salt
3/4 cups milk
Mix dry ingredients. Cut shortening into dry ingredients. Slowly add milk and knead (less is best - the more you knead the harder the biscuits become). Roll out and cut biscuits. Bake until golden brown. Reduce heat to minimum (or turn off and wrap biscuits in tinfoil) to keep biscuits warm until gravy is ready. Serves 6.
3 lbs. sausage
3/4 cups flour
Seasoning salt (or salt and pepper) to taste
6 cups milk
Brown sausage in skillet or dutch oven. Dust flour over the browned sausage and brown it with the already browned sausage. Add milk slowly and thicken to desired consistency. Serve poured over biscuits. Serves 12.
Tuesday, April 9, 2013
The Swedish Chef.
Anyone who has seen The Swedish Chef on The Muppet Show has realized that the comedy comes from the nonsense and the inevitable mess that the character makes. But did you know that these are also common pitfalls in real cooking? The nonsense usually comes from cooking in a hurry, not understanding the recipe or not taking the time to properly prepare ingredients while the mess usually comes from not getting everything organized before the cooking begins. As you can tell, this month's theme is cooking. To help with this there will be two posts per week for the month of April. Each post will also have two sections: The first section will detail some general cooking information or procedures and the second section will feature a recipe that you can try. Check out the online parts of the Scout Handbook on cooking, your regular Scout Handbook and the pamphlet for the Cooking Merit Badge for more information and most of all have fun!
A dutch oven is a medium-large cooking vessel with a lid that is typically made of cast iron, steel or ceramic materials. While not the lightest or smallest of options for cooking and extended trips it is certainly one of the best multi-taskers. Many recipes can be used with this single pot to greatly simplify your cooking and reduce the dishes that you have to clean. However, there are some special precautions that need to be used when using a dutch oven. Some recipes require that charcoal briquettes or coals be placed on the lid once it is on the oven - do not skip this because it sounds odd - the purpose is to create even heating and to increase the heat inside the dutch oven. Also, do not scrub the inside of a cast iron oven overly hard when cleaning and do not clean with soap as it removes the non-stick coating or "seasoning" from the oven and will make your next meals taste like soap. Always remember to reseason cast iron dutch ovens after they are clean and dry. Also avoid high acidity foods with a cast iron oven as this will promote rusting. If acidic foods are unavoidable simply rinse the oven immediately after it has cooled and don't delay the washing. Tips like these will help you get the most use out of a dutch oven as you develop your recipes and cooking skills.
Blackberry Cobbler
(Adapted from Byron's Dutch Oven Recipes)
4 cups fresh blackberries (or 2 bags of frozen then thawed)
1/2 cup sugar
1 1/2 tsp. grated lemon zest
1/4 cup water
Wash fresh blackberries and drain (or let frozen berries thaw then rinse). In a large bowl combine blackberries, 1/2 cup of sugar, lemon zest and water then stir to coat blackberries and let rest.
2 cups flour
2 cups sugar
1 Tbs. baking powder
1 tsp. salt
1 1/2 cups milk
In a separate bowl combine flour, 2 cups of sugar, baking powder and salt then stir to mix. Add milk and beat until batter is smooth.
1 stick butter
Melt butter using 10-12 briquettes under a 12" Dutch oven. Pour batter over melted butter slowly (do not stir). Carefully spoon blackberry mix over top of the batter (do not stir).
1 tsp. cinnamon
Sprinkle cinnamon over top.
Cover and bake using 10-12 briquettes under the dutch oven and 18-20 on the lid for 45 to 60 minutes. Rotate the oven and lid 1/4 turn in opposite directions every 10 minutes until crust is golden brown. Serves 10.
Wednesday, April 3, 2013
Fifty and then some!
While the Troop prepares for this Summer's "50-miler" through conditioning hikes, gear preparation and trip planning start thinking about ways that you can contribute to a service project that can help to improve the trail once the final route is determined. Opportunities should be discussed with Troop leaders who will then check with the recognized authorities responsible for the trail to determine the most practical options. Bring your ideas to our next planning session for the hike. Be sure to also check out the requirements for the 50-Miler Award to see how a small service project fits into the overall picture for a long-distance hike by demonstrating Leave No Trace principles as well as good stewardship of natural resources.
Wednesday, March 27, 2013
The best navigation tool.
Altimeter, GPS, compass, digital compass, map, pace-counting beads, cell phone apps, map measuring tool, UTM ruler, etc. The list is long for devices that can potentially help you with your orientation, navigation and routefinding. However, the best navigation tool is right between your ears - that's right, your brain! Just consider what would happen if you were to get separated from your backpack or otherwise damaged your navigation tools (bug repellant and water have been the culprit many times). In short you would be fine but only if you keep calm and concentrate on what you know. The sun, moon, stars, water and vegetation can all help you navigate without the use of a map, compass or other conventional tools. Check out your Scout Handbook to find out more about how to use these, and other, methods of navigation. If you study different ways to navigate, with and without tools, you will become more confident when faced with changing conditions, locations and resources.
Wednesday, March 20, 2013
Compass anatomy.
There are many tools in your camping equipment that can prove crucial in an emergency situation. Your compass is just such an item, but only if you know how to use it and its different parts. Take at look at the image in this post then write down the numbers on a piece of paper. Try to label the parts of the compass next to their corresponding number. When you are done click the image to see the answers and check your work. You can study your Scout Handbook to get more familiar with your compass as well as how to use it both by itself and with a topographic map. Navigation is a technical and perishable skill - practice often and well!
Wednesday, March 13, 2013
What you might not know can hurt you!
Topographic maps have the most detail when it comes to ground features (topography) and are most useful when on an outing - but only if you know how to correctly interpret the information. This detail means that there are many topographic features to distinguish and understand. Unfortunately, most topographic maps have a limited legend that indicates the features found on a particular map sheet. This makes sense for two reasons: 1. If there was a master legend printed on every sheet there might not be room for the actual terrain features and 2. Not every sheet has the same terrain features (many map legend items might not be necessary). Your Scout Handbook has a brief legend of some common topographic map features that you may encounter when you look at your next map. If you would like to see a more inclusive legend you can check out this link. If you pay attention to contours, ground density features, types of trails and distinct geological features such as mountains, rivers and lakes you will help yourself to be prepared to navigate on your next outing and you will also be able to understand more of the environment around your next encampment.
Wednesday, March 6, 2013
A tale of two...norths?
Odds are that anyone who has held a map in their hands has tried to make it point north. But did you realize that there is more than one north? Both "true north" and "magnetic north" are represented on a topographic map. True north is the direction along the earth's surface towards the geographic north pole (indicated by the star in the image). Magnetic north is the direction along the earth's surface towards the magnetic north pole (MN in the image). In the margin of a topographic map there will be a small graphic that depicts the difference between true and magnetic north. This value will have to be added to or subtracted from your compass bearings for the best accuracy. There are also other ways to compensate for this difference (declination). Check out your Scout Handbook for procedures that involve drawing magnetic north lines on your map and for calibrating a declination-adjustible compass, if you have a compass with this feature. Once you have a good sense of the difference between the "two norths" and how they relate to using your map and compass together you will not have to worry about following skewed bearings and getting lost due to poor accuracy.
Bonus: The declination key above is from the 2011 7.5' USGS Quadrangle for Everett. You can view the map by clicking on the image (it may take a few moments to load). You can then view the map in your browser or download it to your computer to explore the map features. If you download the map use the zoom feature to find the "Scout Shack" and most importantly have fun!
Wednesday, February 27, 2013
Invasion of the little body snatchers.
As Winter slowly gives way to Spring and hiking season gets into full swing many people become concerned, and rightly so, about bugs. From Deet to Permethrin and from lemon eucalyptus to eating garlic (or garlic supplements) there are many products available for making yourself less tasty to insects. A few precautions should be taken to make sure that your invisible armor works most effectively: 1. Never apply around the eyes, nose or mouth; 2. Do not store for long periods of time; 3. Do not expose to high heat; 4. Do not store around food or water; 5. Apply carefully around fabrics and sensitive equipment (such as climbing rope, compasses and electronics); 6. Wash hands thoroughly after handling and before eating or drinking; and 7. Read all precautions and directions on the product label. With the right product and sensible application you can make your outings more enjoyable since you will not be bothered by becoming dinner for the winged, walking and wriggling critters of the woods!
Wednesday, February 20, 2013
Plants, animals and First Aid...oh my!
There are many aspects of First Aid, some of which deal specifically with how to treat a person for exposure to poisonous plants as well as animal bites and stings. While the probability of these encounters is remote, it does happen and usually when it is least expected. One of the first steps to preventing what could become a First Aid emergency relies upon correct identification of the dangerous plants or animals that are suspected in an area. You should know how to identify the dangerous plants or animals in your area (or where you are going on an outing) and specifically how they are dangerous (touch, ingestion, sting, bite, etc.). Next, you should be able to identify what actually caused the incident - only after you identify the plant or animal can the correct treatment be applied. Check out your Scout Handbook for more information on treating a person who has had contact with dangerous plants or animals then study the local plants and animals that pose risk in your specific area. You can then rest assured that you have information that will help you prevent, identify and treat someone (or yourself) when the need arises.
Wednesday, February 13, 2013
Proper preparation prevents panic.
First Aid is one of the most crucial Scouting skills and is also good demonstration of how being prepared can have a dramatic effect on a person's treatment for a variety of medical issues or complications. It should come as no surprise that First Aid is an essential part of all advancement through First Class and is also involved in great number of other Merit Badges. Check out the requirements for the First Aid Merit Badge and review the rank requirements through First Class to see the importance of knowing how to respond in a medical emergency. You can also click the image in this post to learn more about what some commercial medical kits contain as well as the variety of kits that exist for different activities and group sizes. Finally let's not forget, proper preparation prevents panic. Study well!
Thursday, February 7, 2013
Scouts of the Roundtable?
According to Arthurian legend the round table was a place where King Arthur and his knights congregated to discuss the realm - where every knight had an equal voice regarding the business of the court and kingdom. Scouting has adopted the same idea for use with Scout programs by making a Roundtable Meeting a place where Scout leaders can exchange ideas about activities and programs. You are cordially invited to attend a very special Roundtable meeting tonight beginning at 7:00 p.m. at the LDS Church in the Viewridge neighborhood (110 50th Street Southwest Everett, WA 98203 - directions can also be found from the map link on our calendar for tonight's meeting). Come and visit us at the Roundtable and see what the Scout units in the area have to offer. We hope to see you there!
Thursday, January 31, 2013
Gram crackers.
There are many ways in which technology has influenced the business of hiking, backpacking and camping. Ultralight materials, multipurpose items, improved insulation materials and smaller and simpler stoves are all examples of the relationship between weight and comfort on the trail. Check out this Wiki on ultralight backpacking and start to think of ways that you can revise your gear to increase your enjoyment while on an outing. Remember that there are always options for improving your gear and reducing your pack weight, not the least of which being with information and skills training - after all, "the more you know, the less you need." In the final analysis, carrying a lighter load on the trail will allow you to hike further and faster with reduced risk of bodily injury and strain.
Wednesday, January 23, 2013
It's not cool to be cold.
Hypothermia, frostbite, dehydration, exhaustion, cold food...the list goes on and on. Many things can make winter camping difficult if you are not properly prepared. Check out this simple winter camping quiz (from Scouting Magazine) to test your knowledge. Then review the basic camping gear lists in your Scout Handbook (pgs. 270 & 292) to get an idea of how to set up your kit for success. Remember to plan ahead and prepare to adapt to changing conditions so that you will have the best chance of enjoying the weather that usually keeps everyone else on the couch.
Thursday, January 17, 2013
The wild outside your door.
Nearly everyone is interested in some particular type of animal and its natural habitat. From feeding wild birds to viewing animals during seasonal migrations, people like to get a glimpse of the wild outside their door. Discover some interesting facts about local wildlife species by viewing the Washington Department of Fish & Wildlife's species profile pages to learn about animals that you have seen (or are trying to see). Always respect the nature around you and do not attempt to touch, trap or scare the animals that you might be lucky enough to encounter. To help hone your nature observation skills keep a journal of your wildlife experiences, learn about animal tracking by reading about it in your Scout Handbook or explore relevant Merit Badges such as Nature, Mammal Study, Bird Study or Reptile and Amphibian Study.
Wednesday, January 9, 2013
Heavy duty.
Nobody likes to hike while feeling like they are packing a boulder on their shoulders! Knowing how (and how much) to pack will make a significant impact on your comfort while moving on the trail as well as your energy and recovery when in camp. Check out the infographic from REI (click to see the full version then click again to zoom) to learn more about how to choose and load your pack. Pay attention to how things should be arranged in your pack and how proper loading can help to save your shoulders, back and hips from unnecessary strain or injury. Now go experiment with your pack and gear to find the configuration that works best for you.
Wednesday, January 2, 2013
Staying sharp.
Having a good pocket knife to help with a daily tasks is essential (actually its one of the 10 Essentials) but it is also important to realize that using and maintaining your knife safely requires a great deal of responsibility. Fortunately, there are many methods
and tools that can be used to maintain your knife and keep it performing reliably. Check out your Scout Handbook (pg. 402) to learn more about taking care of your camp tools, including your knife. Just remember to always keep your knife clean, sharp and ready and you will be able to trust its performance as it helps you to be prepared.
Subscribe to:
Posts (Atom)